Single Board Computers
This library is designed to be used on a Linux computer, typically with GPIO capability. Most often, this is a verion of the Raspberry Pi device, a single board computer with wide community support. Additionally, we provide instructions for setup and use of this package with the Jetson Orin Nano computer, which has built-in CAN bus capabilities and a more powerful GPU for machine learning or computer vision tasks. For details on exact parts needed for each setup and how to order them, please consult the Part Picker page and the Ordering Guide. Setup instructions for each device can be found below.
Attention
Please read through the entire section for your device before starting.
Raspberry Pi
Required Components
Raspberry Pi
MicroSD card
Computer able to use Balena Etcher or Raspberry Pi Imager
CAN enabling hat
HDMI cable
Keyboard + Mouse
Monitor
Power supply for device
Basic Setup
The instructions on basic setup of the device are provided by the Raspberry Pi foundation here. They will guide you through everything you need to get the computer up and running, depending on the version you have. One consideration is whether to use the full Raspberry Pi OS, or the Lite version. We typically recommended the full version, at least when getting started as it has a normal desktop environment and graphical tools to work with. The Lite version, which does not include a graphical interface, can be useful if you need to squeeze out some extra processing power or memory for your application.
To move onto the next steps, please follow the Raspberry Pi documentation until you have your OS correctly installed, and are able to interact with the Pi’s operating system, either through the GUI or terminal.
Set Up CAN Bus capability
If you are not using any actuators in your application, you may skip this step.
First, double check what CAN bus-enabling device you are using. Most likely it will be a PiCAN2/3 or the Waveshare RS485 CAN Hat (our recommendation because it is more readily available). Either way, both are MCP2515 based devices, and require setting up its overlay in the device tree.
It it is HIGHLY RECOMMENDED that you consult the manufacturer’s documentation on setup for the specific device, as new iterations and versions can require minor differences in setup. In general though, it will involve adding these lines to your
/boot/firmware/config.txt, which may also be in/boot/config.txt. Make sure you edit as sudo or it will not allow you to save.dtparam=spi=on dtoverlay=mcp2515-can0,oscillator=12000000,interrupt=25,spimaxfrequency=2000000
Connect the CAN Hat and reboot the Raspberry Pi. Once this is done, you should have CAN bus available to you through the Linux kernel’s socketcan API. To enable it manually, you can use the following commands in your terminal. This however will be taken care of by Epically Powerful when you go to use it.
$ sudo ip link set can0 up type can bitrate 1000000
$ sudo ifconfig can0 txqueuelen 65536
$ sudo ifconfig can0 up
IF USING PICAN. The PiCAN devices have a small input that needs to have some form of jumper wire soldered to it to connect the 120 Ohm terminating resistor to your CAN Bus. Without this, your CAN devices will not work. Please consult the following video on how we recommend this be done.
Jetson Orin Nano
Required Components
Jetson Orin Nano
MicroSD card
CAN transceiver
MicroSD card
DisplayPort cable
Keyboard + Mouse
Monitor
Power supply for device
Basic Setup
To set up the OS on the Jetson, follow the instructions on the NVIDIA website to flash a microSD card. We recommend a card with at least 32 GB. They also have more extensive documentation on their website.
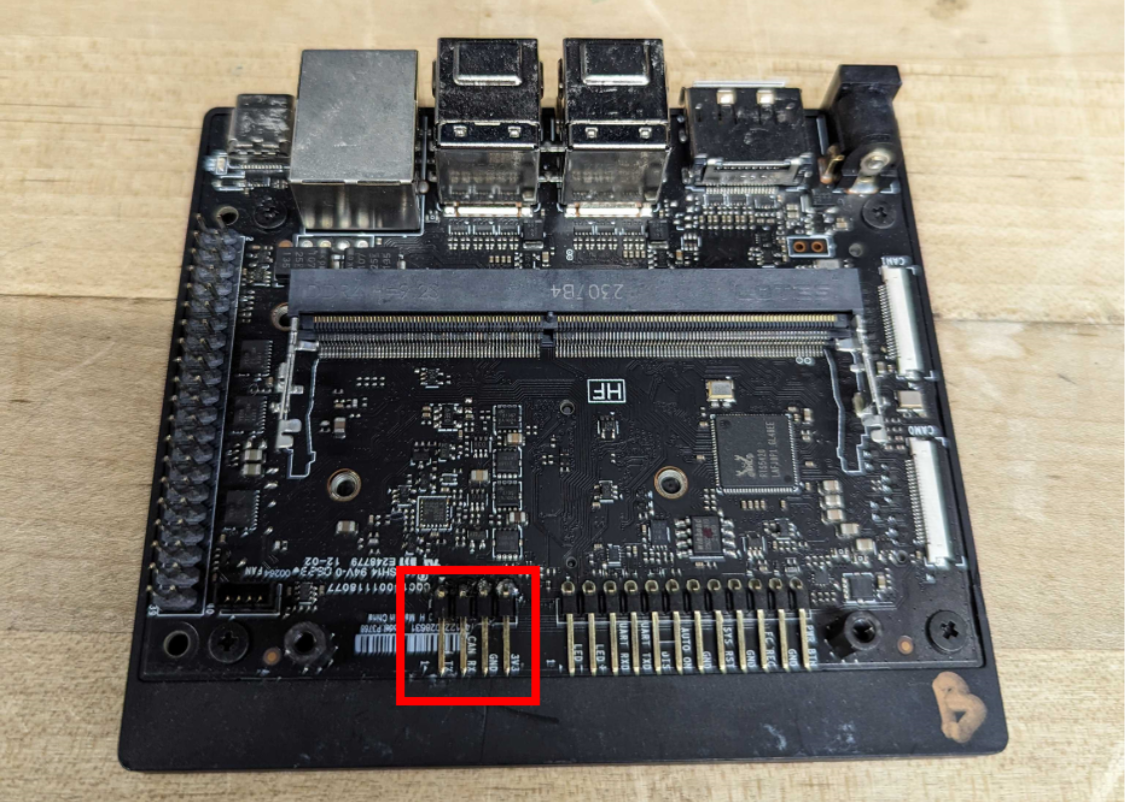
To enable actuator communication, solder the 4 CAN communication pin holes in the Jetson’s carrier board with 90° male-to-male pins.
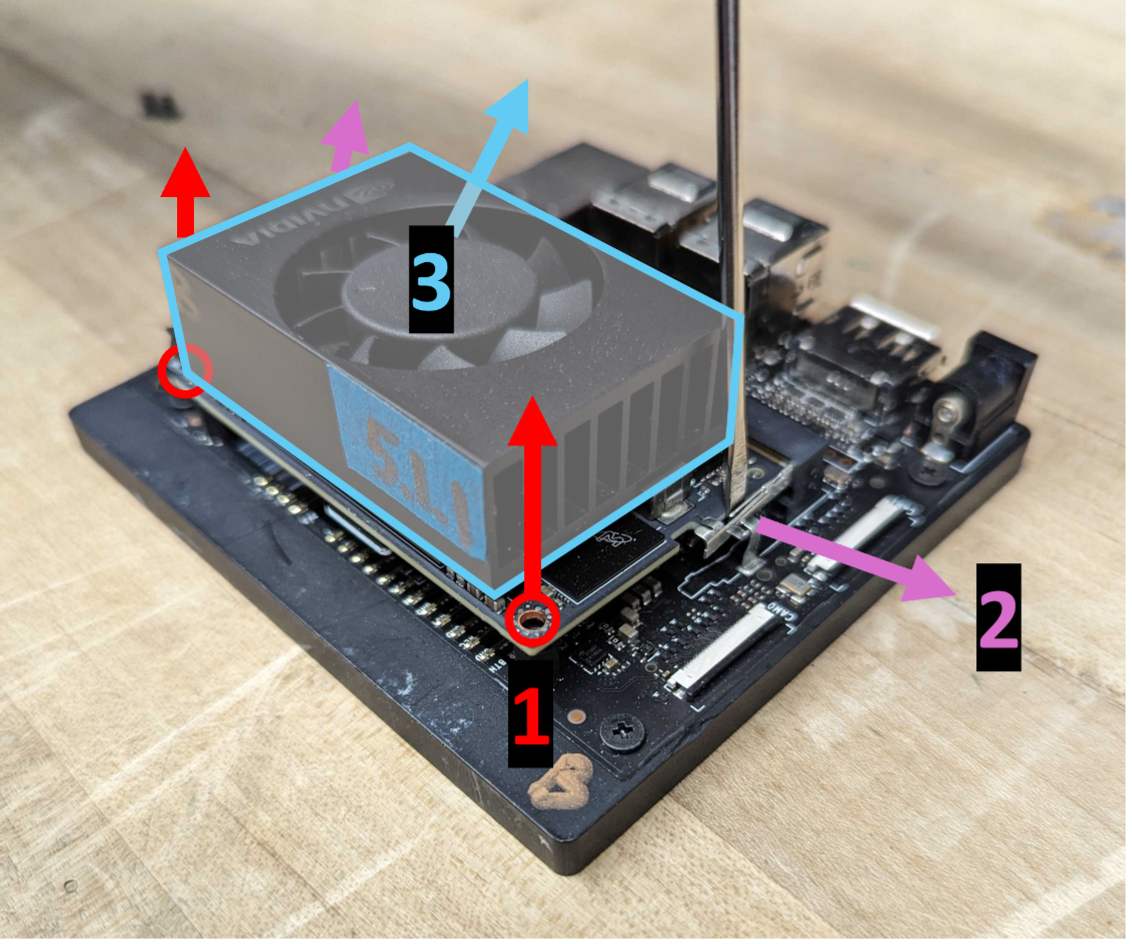
Unscrew the bolts on either side of the fan on the top board, shown as (1) in image below.
Pull out the metal pins holding the top board in place to either side, shown as (2) in image below.
Raise up the side of the board with the bolt holes, then gently pull the board away from the carrier board slot that it is plugged into, shown as (3) in image below.
Caution
Be careful of the fan cable that is plugged into the carrier board!
Now, solder four 90-degree pins (like those soldered into the adjacent holes) into the holes indicated on the carrier board.
Caution
Be extremely careful not to damage the carrier board by applying too much heat with the soldering iron! If you do, there is a possibility that CAN communication will not work as intended.
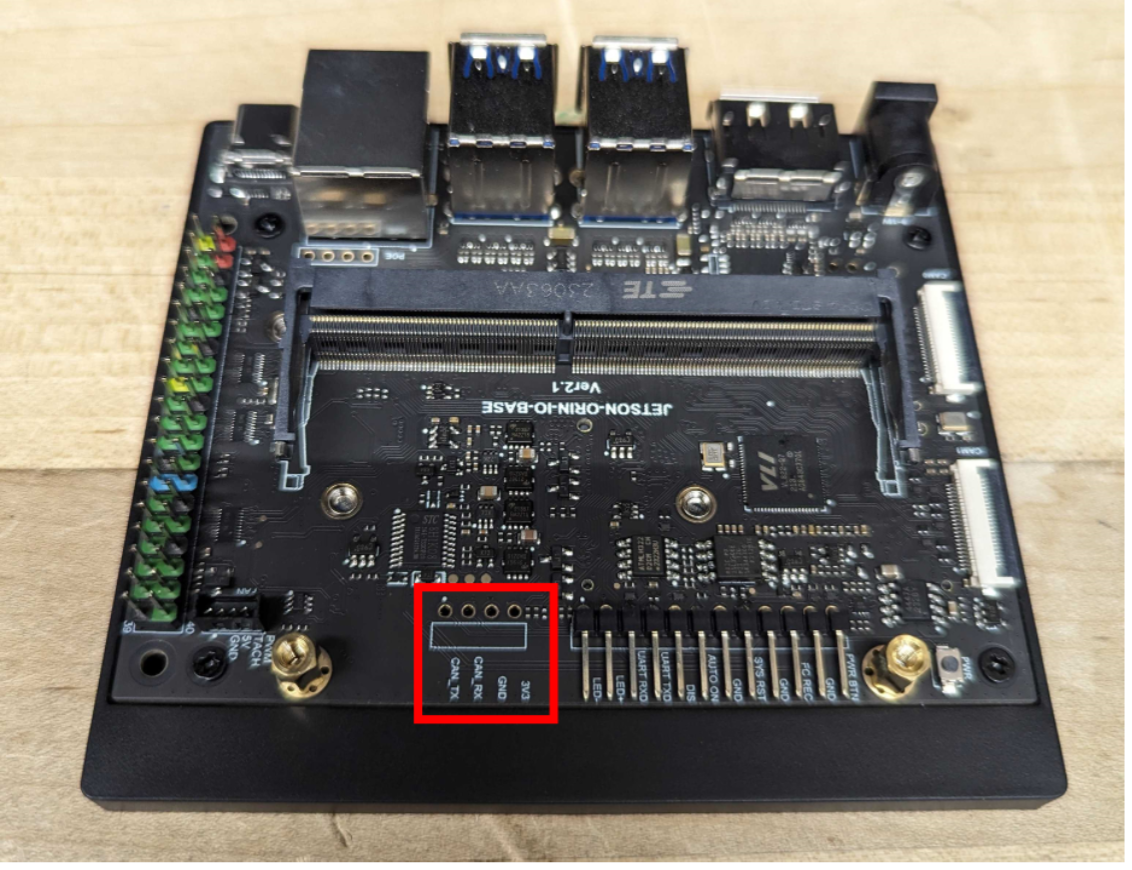
The final product should look like the image below (with soldered pins indicated).
Software Setup (for all computers)
Python environment
While everything can be run using the system python environment, we highly recommend using some form of virtual environment, as incompatible versions and installed modules have the potential to interfere with operating system application if something goes wrong. We discuss possible options on our Python Environments page.
Warning
While it’s possible to install this and other packages without a virtual environment, we (and official Linux developers) do not recommend doing so because it can break your operating system. If that’s not enough to motivate you, recent Raspbian releases now require you to use a virtual environment to use pip install.
MicroStrain Communication Library Setup
Note
If you do not use the MicroStrain IMUs in your application, you can skip this.
The low level interface library for communicating with the microstrain IMUs are currently unavailable through pip or anaconda, and must be installed manually. Please see the specific guide for installing on our MicroStrain IMU Library page.
Installing Epically Powerful
To install, follow these steps:
Activate your virtual environment
Run the following code:
$ pip install epicallypowerful
Now you are all set up and ready to run Epically Powerful!